If you have been living under a rock or don't have young kids you could be forgiven for not knowing anything about the phenomenon that is Minecraft. If you have young kids however, you will know just how popular this computer game is.
My son got into Minecraft some time back. He had seen it at another friends house and enjoyed playing with the blocks, making houses, boats etc. We downloaded a demo for him to play with and once we saw how much he enjoyed it, we purchased the full copy. I like this game as it allows my son to use his imagination rather than just staring at a pre made, pre determined game. He has many different 'worlds' with different themes, and he has friends he can play with online which I think he enjoys the most!
I knew that at some stage this would become a theme for a birthday party and sure enough he asked for it! As the game has become so popular, there is a whole host of party ideas out there, from items that can be purchased to downloadable freebies or packs which can be bought from places like Etsy.
I like to find freebies that I can either use or inspire me to create my own. There was plenty to choose from!
You may have heard of a great site called Catch my Party. They showcase people's birthday parties, catering for a huge range of themes. It is a brilliant place to find inspiration and also occasionally they have freebies! They had some free Minecraft printables which I just had to have! You can find them here. I didn't use all of them and also I found other ways to use some of the printables from their original use.
Let's start with the party decor.

I used the banner for the food table. I printed it out on white card and attached it to string to hang up. I had seen online someone using black and green balloons to represent creepers, so I did the same. I used the food cards to set up the table adding in a couple of ideas of my own as the pack does come with a blank card. I found another set online with different items on them and printed those out to stick onto the blank cards. Sadly I can't find the original link, however, if you recognise these and can point me in the right direction to give them credit, please comment below!

I followed some of the ideas I had seen online for the food ideas. Strawberries for Redstone, Watermelon for, well, Watermelon and Twizzlers for TNT. I had seen online a way to make candy to represent Diamonds, but I just purchased some clear mints.

Grapes for Slime balls, miniture cookies for Cookies, and Rolos for gold. I couldn't buy individually wrapped Rolos, so got some gold foil and wrapped them myself.

I bought toffee apples for Golden apples but you could just use apples, mini crisp sticks for Sticks, mini bread sticks for Bread and mini carrots for Carrots. As the party was held in the late afternoon, snacks seemed the best option. I had extra amounts to re fill the trays, which I had to do many times! I bought clear plastic trays and black foil trays from Sainsburys.
After seeing a few parties with grass tablecloths, I ordered a plastic tablecloth which looked like grass.
I did attempt to make some coal, using this pin. I could not find the original link, so had to guess quantities for the ingredients. I will say I used too much butter so they weren't very sweet. Also they did give anybody who tried one a black tongue!
I also found some free printables to make your own cardboard Minecraft characters. I selected a bunch I liked, carefully cut them out and stuck them together. They took forever! They were a real pain but the effect was good! I used double sided squares to stick them together as they were so small and fiddly to use glue, but whatever is your preference. You can find the printables on my Minecraft party ideas board here.
I purchased green square plates and napkins from Ebay. I did think about making Creeper faces for the plates as I had done for the Lego party but decided to leave them blank. I also purchased black cutlery but not a lot of it was used.
To finish off the decorations for the food table, I made some paper chains which I also found online. They can also be found on my Pinterest board.

I always like to decorate the front door to welcome the guests to the party. I found a poster online, and using Picasa's poster tool, was able to enlarge it, stick it onto card and attach it to the front door. I also found online a printable for the Minecraft signs. I also downloaded a Minecraft font and edited the sign to allow me to write anything on them! Again these can be found on my Pinterest board.
We had games set up in the garden that the kids could dip in and out off as well as my son's swing set and snooker table to play with.

I'd seen 'Pin the tail on the Pig' Minecraft games and it did seem kind of fun. I again went searching for a large picture and blew it up using Picasa's poster function. I stuck the print outs onto card and made little pink strips for the kids to pin. They all enjoyed it mainly for the Minecraft goodies they won!

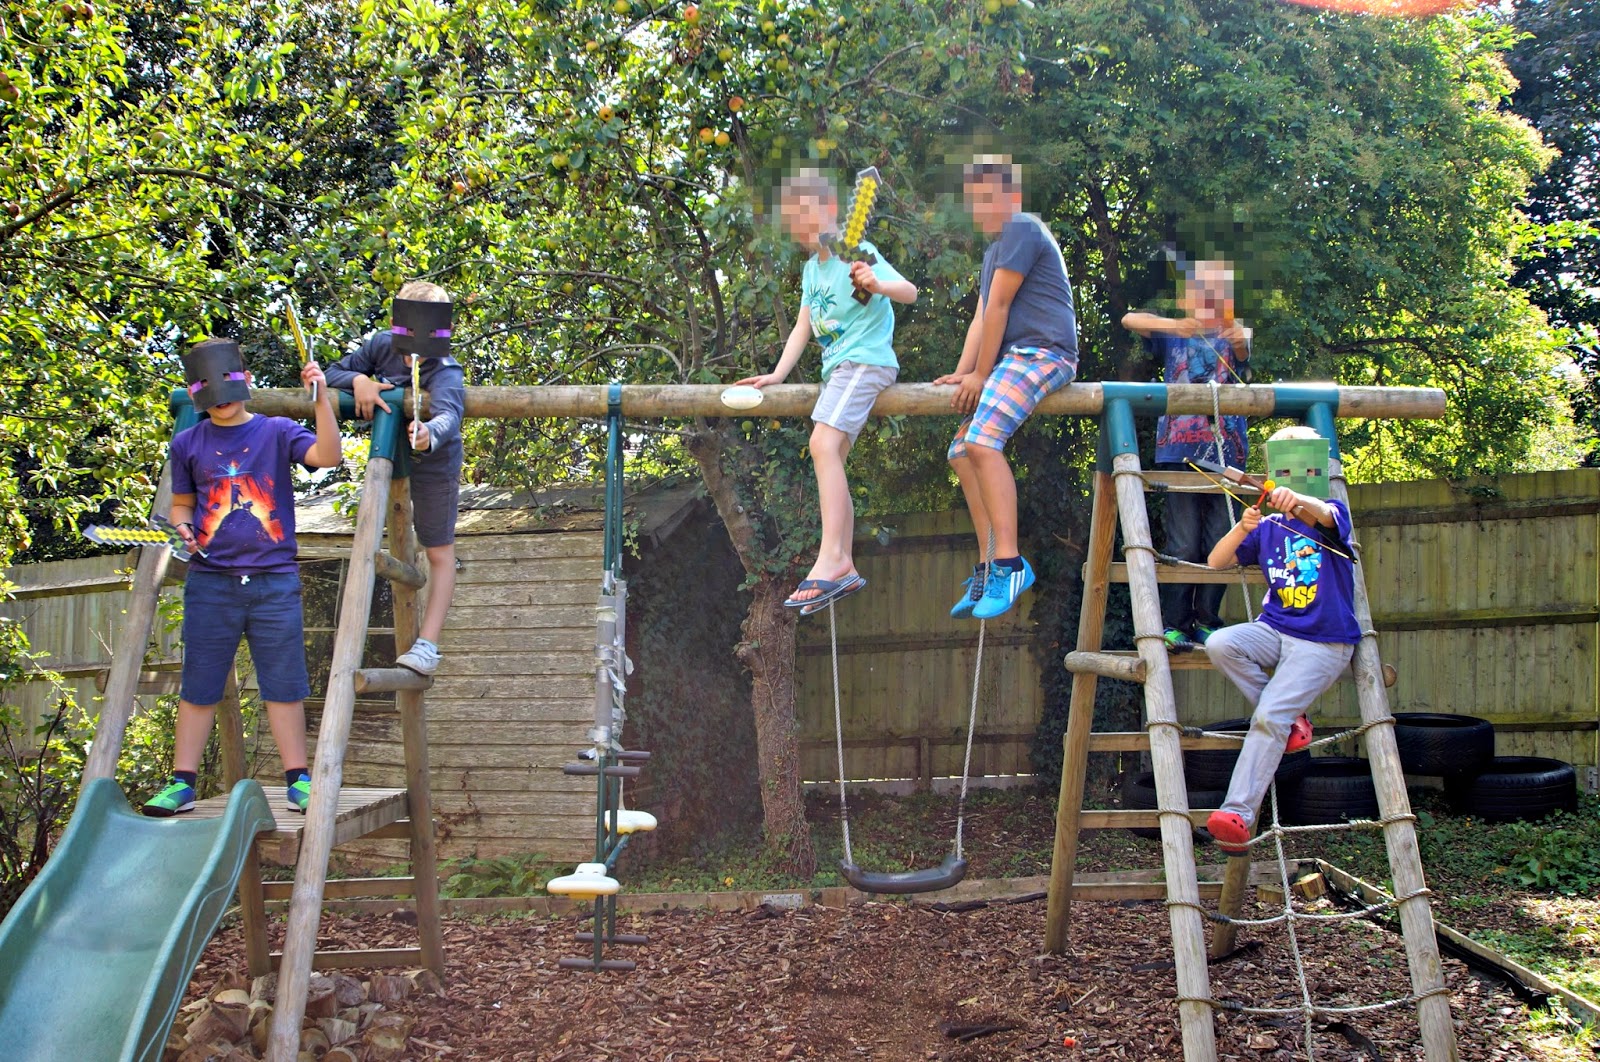
I came across a pin from Ziggity Zoom which featured Minecraft party ideas (you can see the original post here). The main thing that caught my eye was the foam Creepers they had made to shoot with bows and arrows. I managed to secure a bunch of square boxes from a store which I then painted green with black sharpie features for the Creeper faces. I purchased 2 cheap toy bow and arrow toys from The Entertainer and made a sign to indicate what the purpose of the game was. I set it up on a foldable picnic table and away from the main party area so that the kids had plenty of range using the bows. This was a big hit!

We used our gazebo as a Minecraft house. I printed out different Minecraft blocks and stuck them to the sides of the gazebo.

I set up another sign saying 'Defend the house from the mobs, use your sword'. As you might be aware, the foam official swords you can buy are extremely expensive. Thankfully Pinterest came to the rescue with this post from All for The Boys. She had designed a Minecraft sword in 2 pieces that you could then stick onto foamboard and cut out! It's genius but a total pain to make! I am glad I only had 8 to make! They didn't last long as I suspected once the boys started playing with them but they loved using them. I put these and the bow and arrows in buckets so that they were easy to get hold of.

I thought they might enjoy wearing masks so that some of them could be 'mobs' and others could be 'Steve', I used the life sized heads from Pixel Papercraft (you can find them here), which I printed onto paper, then pasted onto card. I hole punched holes either side and tied black elastic through the holes. You could just print them directly onto card.

No Minecraft party would be complete without a brewing station! There are loads of these floating around on Pinterest, and you can purchase sets to make your own. I made mine for free!

I used a large piece of foam board for the sign. I found a picture of a potion bottle online (the one I used can be found on my Pinterest board) and enlarged it. I then printed it out and coloured them in based on the Kool aid sachets I had managed to get hold of. I tried to match the game as much as possible by researching the colours of the potions. I also found online picture of the brewing stand as it looks in Minecraft. I printed off the potion names using the Minecraft font and stuck all this to the foam board. We experimented before the party with how much Kool aid powder, sugar and water would be needed for one drink. I then added those quantities to the potion board so that the kids had a recipe to follow.

I used the blank food cards to show the flavours of the drinks (the flavours were also written on the potion board). I had some plastic jelly cups left over and used those for the Kool Aid powders and sugar. I had large plastic jugs for the water and green cardboard cups for them to make the drinks in.

They all went back to this station many times, and all I can say is I am glad it was outside! Powder, sugar and water everywhere!


They had so much fun outside, but of course no Minecraft party would be complete without an actual go on the game!
We split them into pairs and let them have short timed goes so that everyone had a fair shot playing. My son had set up a special 'birthday' world.

The others either watched or carried on playing outside. We are glad we limited time on the game though as we doubt they would have had much time to enjoy the outside activities.

My son was very happy with his cake! I did make the mistake of using a brownie cake recipe, that while delicious, did not rise very well. We didn't end up with a cube, more a large square! I was able to purchase square fondant cutters from Hobbycraft, and following ideas found on Pinterest, was able to cut out the right colours to represent a grass block. I made the toppers out of fondant following other cakes and pictures from the game. I didn't think I would do a very good job on the sword, so used one of the cardboard cut outs.
At the end of the party I wanted to give out party favours. I had seen other people making Creeper faces on plain party bags using a sharpie. I found a template of a Creeper face, printed and cut it out and used that to draw faces onto the bags.

Everyone got a piece of cake along with all these goodies! I purchased the wristbands from EBay, but the rest was homemade! The Enderman and Creeper keyrings were made with Hama beads. I purchased key rings and attached them to the beads once they were ironed. You can find the Hama bead designs on my Pinterest board.
I found a blog called Unskinny Boppy and she had a free printable for Minecraft magnets. I purchased magnetic sheets from Hobbycraft, printed out the free printables on photographic paper, glued this to the magnetic sheets and carefully cut them out once dried. This was very successful and cost me about £6.00 for the sheets. See the original post here.
Finally I found this blog called Say Not Sweet Anne. She had made fantastic Creeper shaped marshmallows which I knew I just had to copy! There were such fun to make, my son and I were transfixed as the mixture got bigger and bigger and more marshmallow like. Find the instructions here.
The party was a big hit and would be great for any Minecraft fan!
Click here to view my Pinterest board.
Have a great weekend!
No comments:
Post a Comment